- Published on
Home-made present: how to make a punch box
- Authors
- Name
- James Brady
- @james_elicit


I was always told to prize gifts that people had put time and effort into. Hoping my SO shared the same view, I decided to make her a little something for her birthday.
Being creatively barren, I attempted plagiarism.
I remembered seeing this Kickstarter project ages ago. It's based on an old parlour game: the idea is to conceal little messages inside a nice-looking block, to be popped out with a pencil when the recipient feels like it.
Now, that Kickstarter project is long since finished but I reckoned I could have a pretty good go at making my own version. Here's what I ended up with so you can decide whether to keep reading or not:

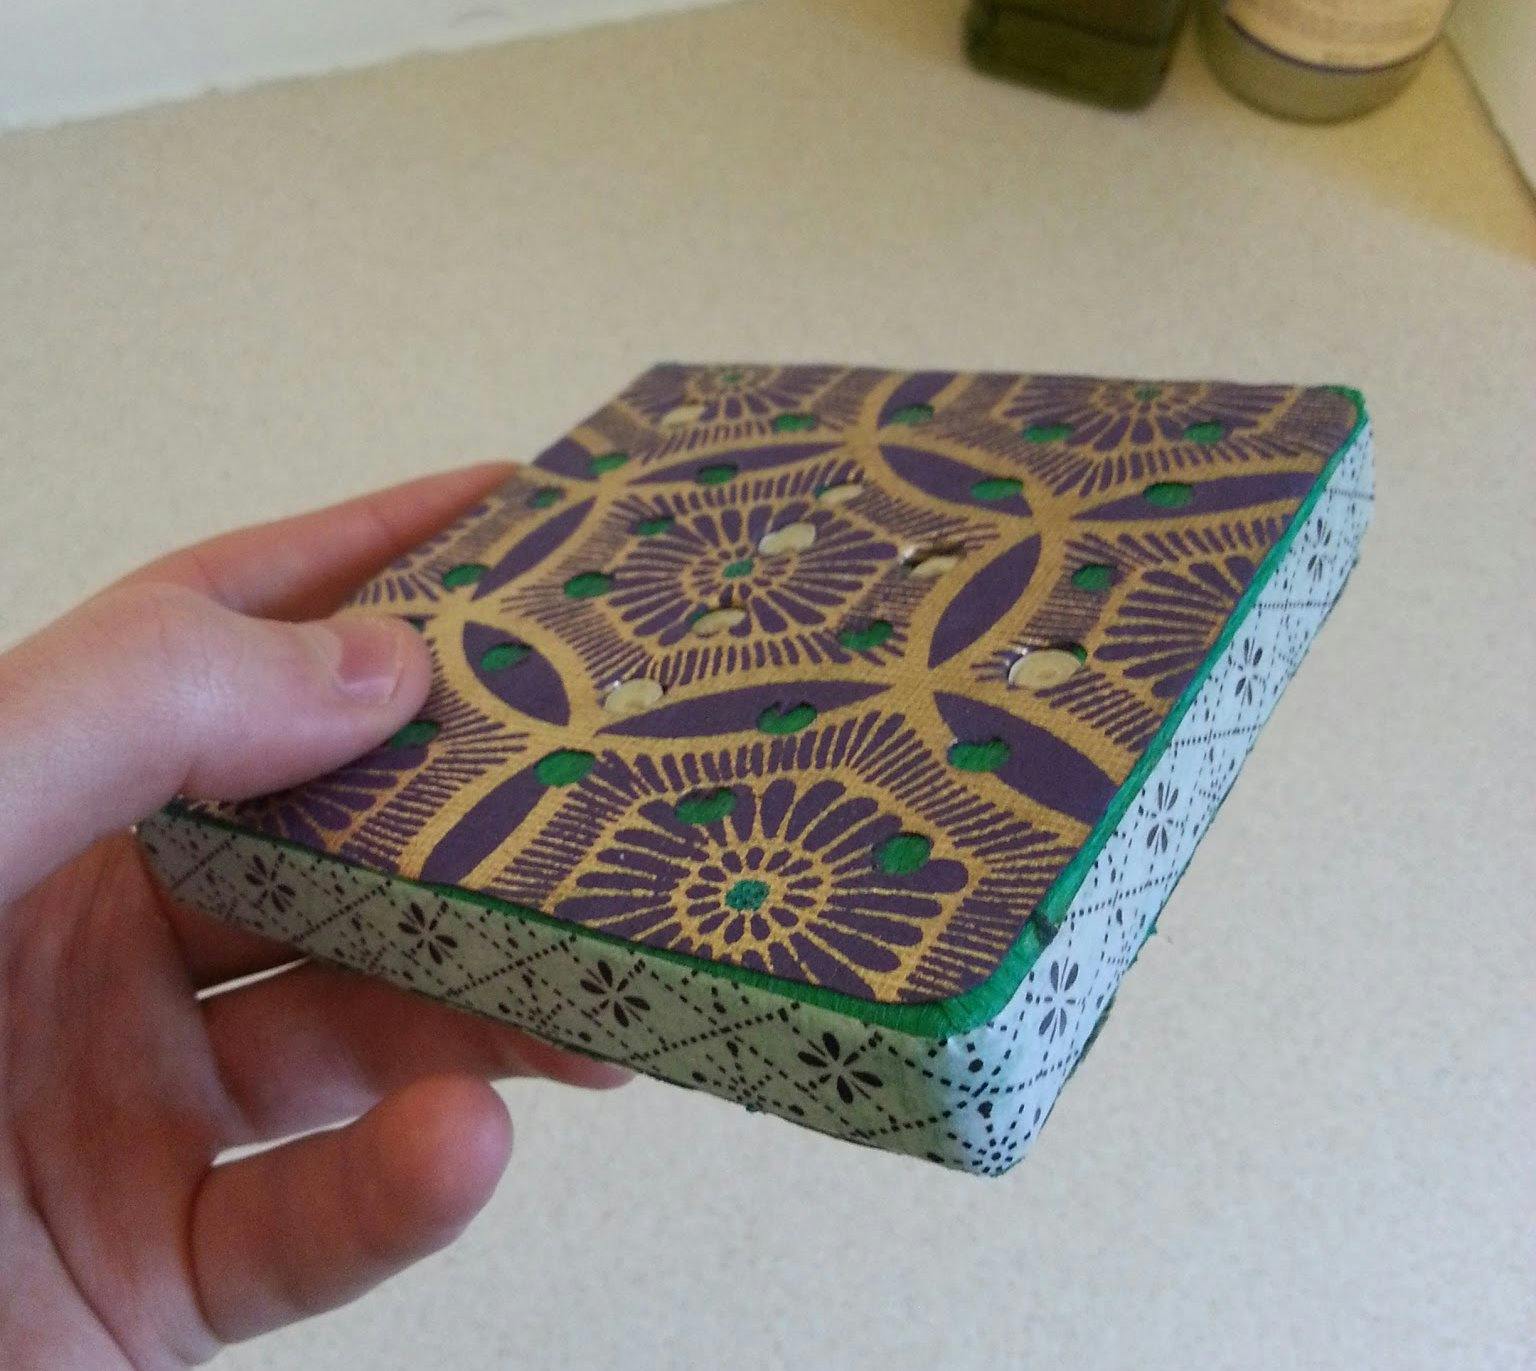
I know, it looks like shit doesn't it? Don't worry: they'll be blown away that you made the effort .
What you'll need
- three blocks of wood (I used 150mm × 150mm × 20mm, but up to you)
- crêpe paper
- two pieces of thick, patterned paper (the same size as the faces of the blocks, e.g. 150mm × 150mm in my case)
- washi tape
- glue (I used 3M spray mount)
- writing paper
- a drill and ~5mm bit (ideally a drill press but not absolutely required)
What we're aiming for
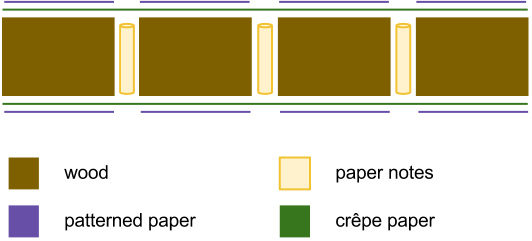
The structure of the block itself is really simple: it's just a square-ish cut of wood with holes drilled through. Rolled up notes are inserted into these cylindrical holes, and we stick crêpe paper on both faces to hold them in place.
To make the object a bit more appealing, we'll add some patterned paper to the top and bottom of the block, with holes pre-punched in it. This makes it easy to see where the notes are hiding, and hence where the recipient should poke a pencil to get one out.
Lastly, we'll use washi tape – basically patterned sticky tape – around the edge, to keep the crêpe nice and tidy.
This shows a cross-section of the completed box:

How to do it
Creating the rolled up notes
- Cut the writing paper into strips. I found that 210mm long strips (the width of A4 paper) can be rolled up to fit in a 5mm hole. They should be a couple of millimeters narrower than the wood; e.g. with 20mm thick wood, cut 18mm wide strips.
- Write your notes on the paper strips. I can't really help with this bit!
- Roll the notes up into tight spirals. I set it up so that as they were unrolled, the message gradually appeared as written.
Preparing the wood and patterned paper
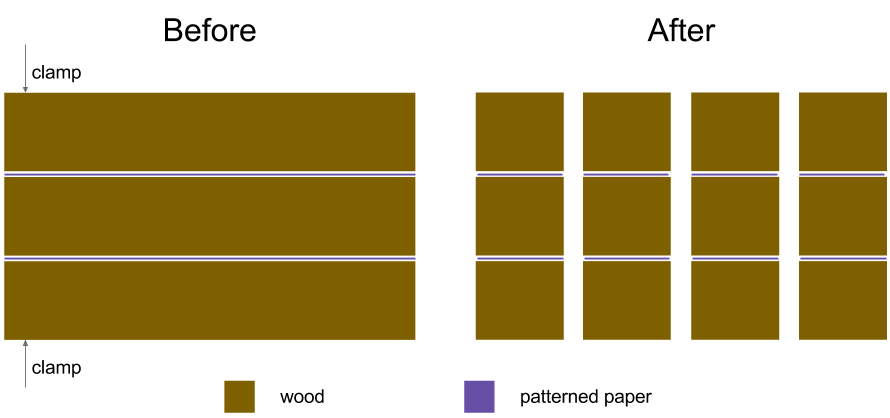
What we're aiming for here is a wood block with holes drilled in it, and patterned paper with holes in it that exactly match the layout of holes in the wood block.
To do that, we'll sandwich the wood and paper together (using two sacrificial wood blocks to prevent tear-out) and drill holes in the wood block and patterned paper at the same time. This guarantees the holes in your paper will line up with the holes in the block.
- Cut out pieces of your patterned paper. The pieces should be just big enough to cover the two largest faces of the block. Mark the paper and blocks to remember which one goes on which side.
- Layer your wood blocks and patterned paper. Wood block, patterned paper, wood block, patterned paper, wood block (see below).
- Clamp the wood and paper.
- Drill holes through the whole lot. This is where a drill press would be really handy. If you don't have one, make sure your drilling at a perpendicular!
Here's how the wood-paper sandwich looks before and after drilling:

Inserting the notes
- Glue crêpe on the bottom of the wood block. Apply glue to the wood rather than the crêpe, so that you don't glue the crêpe to the notes accidentally. Don't use too much glue because excess will easily soak through the paper!
- Insert rolled notes into the holes in your wood.
- Glue crêpe on the top of the wood block. Again, apply glue to the wood rather than the crêpe.
- Stick washi tape round the edge of the block. A sharp knife makes it easier to get the ends of the tape to sit close to each other without overlapping.
- Stick patterned paper on the top and bottom of the block. Use the marks you made to ensure you have the right piece of paper, in the right orientation, on the right face.
- Leave to dry.
To ensure that there wasn't an unsightly crêpe paper join at the edges of the box, I cut the bottom piece of paper too big and wrapped the excess up and around the sides of the box. That way the top piece of crêpe met and overlapped with the bottom piece.